Thursday 13 June 2013

Assessment 3 Collection Submission

BODY OF WORK: COLLECTION

Submitted Images, by Maegan Scott


What is the use of a book without pictures or conversations? - Alice, 2013

I'm late, I'm late - The White Rabbit, 2013

Curiouser and curiouser - Alice, 2013
 
 We're all mad here - The Cheshire Cat, 2013


Why is a raven like a writing desk? - The Mad Hatter, 2013

Off with their heads - The Queen of Hearts, 2013


Artist Statement:

DOWN THE RABBIT-HOLE

“There is a place. Like no place on Earth. A land full of wonder, mystery, and danger! Some say to survive it, you need to be as mad as a hatter...which luckily I am.” (The Mad Hatter, Alice in Wonderland, 2010)  This collection explores the wonders of Alice’s dream-like land, in which ‘everything would be nonsense’. I was inspired by the way in which the eccentric nature of the novel creates an indescribable reaction in the reader. The intention was to expose the bizarre and curious characteristics of Wonderland and consequently experiment with challenging the viewer to look beyond what they first see, and appreciate the peculiarities.

Essentially this collection is influenced by my childhood. From reading various novels, picture books and watching movies, to playing scrabble with my parents, making up words and ignoring the rules of the game. After having previously experimented with using scrabble in my photography, I found this was a quirky way of elaborating on the fantastical qualities and oddities in the novel, as well as expressing well-known quotations.

The collection uniquely considers the use of subtle aspects to characterize the unusual, with the push and pull between reality and illusion. Normal, everyday objects, and scrabble tiles, alongside strange or manipulated aspects, highlight how each character is fascinating in their own way, by both their physical traits and dialogue. Although one collection, each image has individuality, similar to how each character has their own individual quirkiness. As a collection, they highlight the bizarre imagination of Alice and create sense of uneasiness.

A Nikon D5000 with an 18-55mm lens was used to include all of the subject matter and allow for cropping in Photoshop. Using a Nikon DSLR camera enabled me to work with and digitally manipulate high quality photographs. Alongside digital manipulation, the use of tea cups, jewellery, playing cards and scrabble tiles, gave me the opportunity to play with and represent the quirky, creative ideas present within the novel.

The photographs as a collection take me on a journey through wonderland, without losing sight of reality. In the end, we are chased back to reality because we know it is not real; however, it is nice to have a moment where we allow our imaginations to fall down the rabbit-hole.


Order of my collection 'Down the Rabbit-Hole'

The order I have decided to place my final six images in is as follows:


Laying them out on the screen, I wanted to replicate the sequential journet Alice takes through Wonderland.

Order:
'What is the use of a book,' thought Alice, 'Without pictures or conversations' - Alice
When Alice is sitting with her tutor, off in her own world...

'I'm Late, I'm Late' - White Rabbit
The White Rabbit captures her attention and she can't help but follow him...

'Curiouser and Curiouser' - Alice
Alice falls down the rabbit-hole and eats things and drinks thing simply because she is curious...

'We're All Mad Here' - Cheshire Cat
She meets the Cheshire Cat who gives her directions...

'Why Is A Raven Like A Writing Desk?' - The Mad Hatter
She stumbles across the Mad Hatter's Tea Party for everyone's unbirthday...


'Off With Their Heads' - The Queen of Hearts
She follows the Rabbit to the Queen's castle and is put on trial...
I think this order works well with the novel and movies, as well as with the colour scheme and the detail of the images.

Thursday 6 June 2013

Week 11 Exercises:

Using Actions in Photoshop (Automation):

Actions are a group of actions or stages that are kept as recordable sets
so you don't have to perform them time and time again yo record them and play them onto the next image
droplets to change images in batches

- default actions in photoshop, largely examples
- ie. Vignette
- ie. sepia toning (shown below)

Open file:

Various Automations in Photoshop shown in list on the right:

Chose one to apply:

ie. Sepia, press play:


Another Example:
Open file in Photoshop:
 
Creating your own Action:
Duplicate Layer first:

Press Record:

Rename your action:

 ie. Black and White

Image, Adjustments, Black and White:

Image, Image Size:

Adjust Size:


Stop!!

Apply your action to a new photograph:
Open new file:

Press play: action applied

Apply to a whole folder:


All images have the same filters/adjustments/size etc.:

Automation is a really clever tool! It is awesome how you can save a process and apply to another photograph in a couple of seconds! Or a whole folder in under a minute! As CJ says it saves us time in our young lives!

Week 11 Exercises:

Bracketing Exercise:

ISO 200 constant
loose quality when you reduce ISO
this exercise looks at depth of field and aperature


2 Exercises:

1. pick a point with shutter sped and take 5 exposures
move aperture not the shutter speed
FOR EXAMPLE:

f11 aperature, speed 1/250
change aperature
f11, f8, f5.6 over expose 
f11, f16, f22 under expose

2. pick aperature (middleish f11)
cloudy day today, exposure will vary
don't change apaerature, change shutter speed
FOR EXAMPLE:

f11 aperature, speed 1/250
WANT 0 on exposure (not too close to + or -)
then over expose by a stop (make it slower so more light has time to go into the camera)
half and double idea - start at 1/250 2nd 1/125  1/500 1/1000
over and under expose twice (two stops over)


NOTE BRACKETING:
  • aperature and shutter speed relaive to what you are pointing at
  • midtones, shadow areas and highlight areas
  • matrix on average metre (not spot)
  • averagae exposure for scene results
 DSLR CAMERAS:
  • move 1/3 of a stop not one stop, because they are digital!
  • The result is greater range of exposures!
  • +/- button changes the shtterspeed/aperature depending on camera and wheel 
 Depth of field does not change when you change ISO, its controlled by your aperture, so when you go from f9 to f16 there will be things out of focus, because depth of field is adjusted. 
Change shutterspeed instead (1/???) because it won't change depth of field when you do bracketing! If you way something that's far away play with shutter speed not aperture!


 KNOW THE DIFFERENCE BETWEEN ISO, APERATURE AND SHUTTER SPEED


Bracketing Exercise in Practice 07/06/2013:

f/11 ISO 200 1/200


f/11 ISO 200 1/400


f/11 ISO 200 1/800


f/11 ISO 200 1/100


f/11 ISO 200 1/50


Combined Image on Photoshop (unfinished)


I think with more time this technique would be really good to play around with and use in my photography! I think it's an effective way of ensuring you get the right exposure and can manipulate the photographs without having to go back and reshoot because you stuffed up the exposure. You get to use the best of everything to create one image which is evenly balanced and toned. I think this is clever and I'd like to use it in the future with my photography.

Monday 3 June 2013

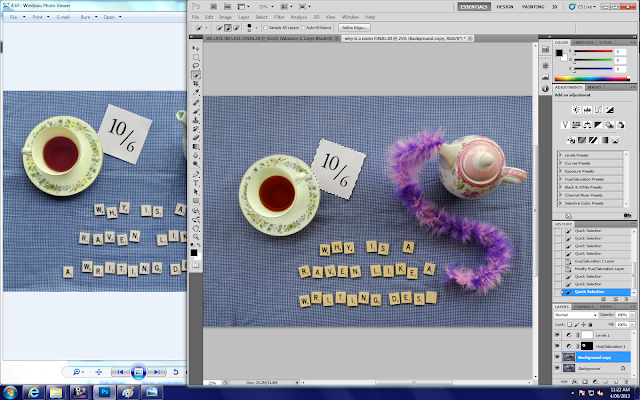
'Why Is A Raven' Photoshop Editing

Using photograph taken in sixth round of my photography for Alice Theme:
 
Open chosen image in Photoshop:
 
Duplicate Layer:

Crop Photograph:
 
 
Start playing with the levels, adjustment layer - to adjust the entire image:


Select specific item to start working on:

Hue and Saturation Levels adjustment

Select paper to bring out the Mad Hatters fraction from his hat:

Adusting levels:
 
Select all except text:
 
Select Inverse:


Adjust levels of text (wanted a more vibrant picec of paper and text):


Select the teapot: 

Adjust Hue and Saturation (referring to previous edited image - because I liked the pale pink and green through adjustment layers):
 
 
Being the perfectionist I am, I decised to use the clone tool to remove the tea cup handle below the teapot handle: 


Select the scrabble tiles:

Add vibrance and saturation adjustment layer:

Duplicate Background layer:

Convert to Smart Object:

Filter, Sharpen, Smart Sharpen:


Damn scrabble never has the letters you need, so lucky I have photoshop to replace the missing scrabble letter K: 

Free Transform to put the piece in place:


Image to use in tea reflection:

Make selection and copy:


Paste into photograph file:

Adjust layer order:


Copy another copy of the teacup and change the transparency:

Eraser tool to remove the tea:


Bring create layer of teacup over the top and adjuct transparency:


Let's just say I am picky, so I did it all again!!! Paste image....


Zoom out to have a look at the overall image:
 
 
I am really happy with how this image has turned out! I love the subtle references to the Mad Hatters Tea Party, like the reflection or the 10/6 fraction seen on his hat in the movie! I think the quote is quirky and really gets you thinking, just like I hope my final photographs do!!